Monday, December 3, 2012

4 steps to get salad in December

Saturday evening, December 1, we had a salad with supper, and 100% of it was picked about an hour before the meal in the Givler Garden.  It had purple lettuce, mustard and radish leaves, diacon radishes, sliced celeriac root, and carrots.

So how do you get a fresh home-grown garden salad in December?  The truth is that it's not hard...
1.  Plan for it.  In March, after I'd planted my early seeds, I made two piles with what was left, one for a late-spring/early summer planting and one for a late summer/early fall sowing.  Crops that love heat were in the summer pile, and crops that tolerate cold well were in the fall pile.  If you want to put out seeds late in the season, you must already have them in hand, as those pretty little seed packets are nowhere to be found for sale in August and September.
2.  Re-sow your garden early and often.  Have a hole where spinach didn't germinate?  Pop in some onions, or toss in some marigold seeds.  Harvest all your bush beans or radishes?  Put in new seeds...preferably something from a different plant family so they will be sucking a different mix of nutrients from the soil.  Crop rotation also helps keep the insect pests baffled.  Don't forget to add compost when you re-plant.  Leaving chunks of the garden empty doesn't make sense to me.  If you want to give it a break and improve the soil, plant a cover crop that you'll chop back into the soil before it goes to seed.
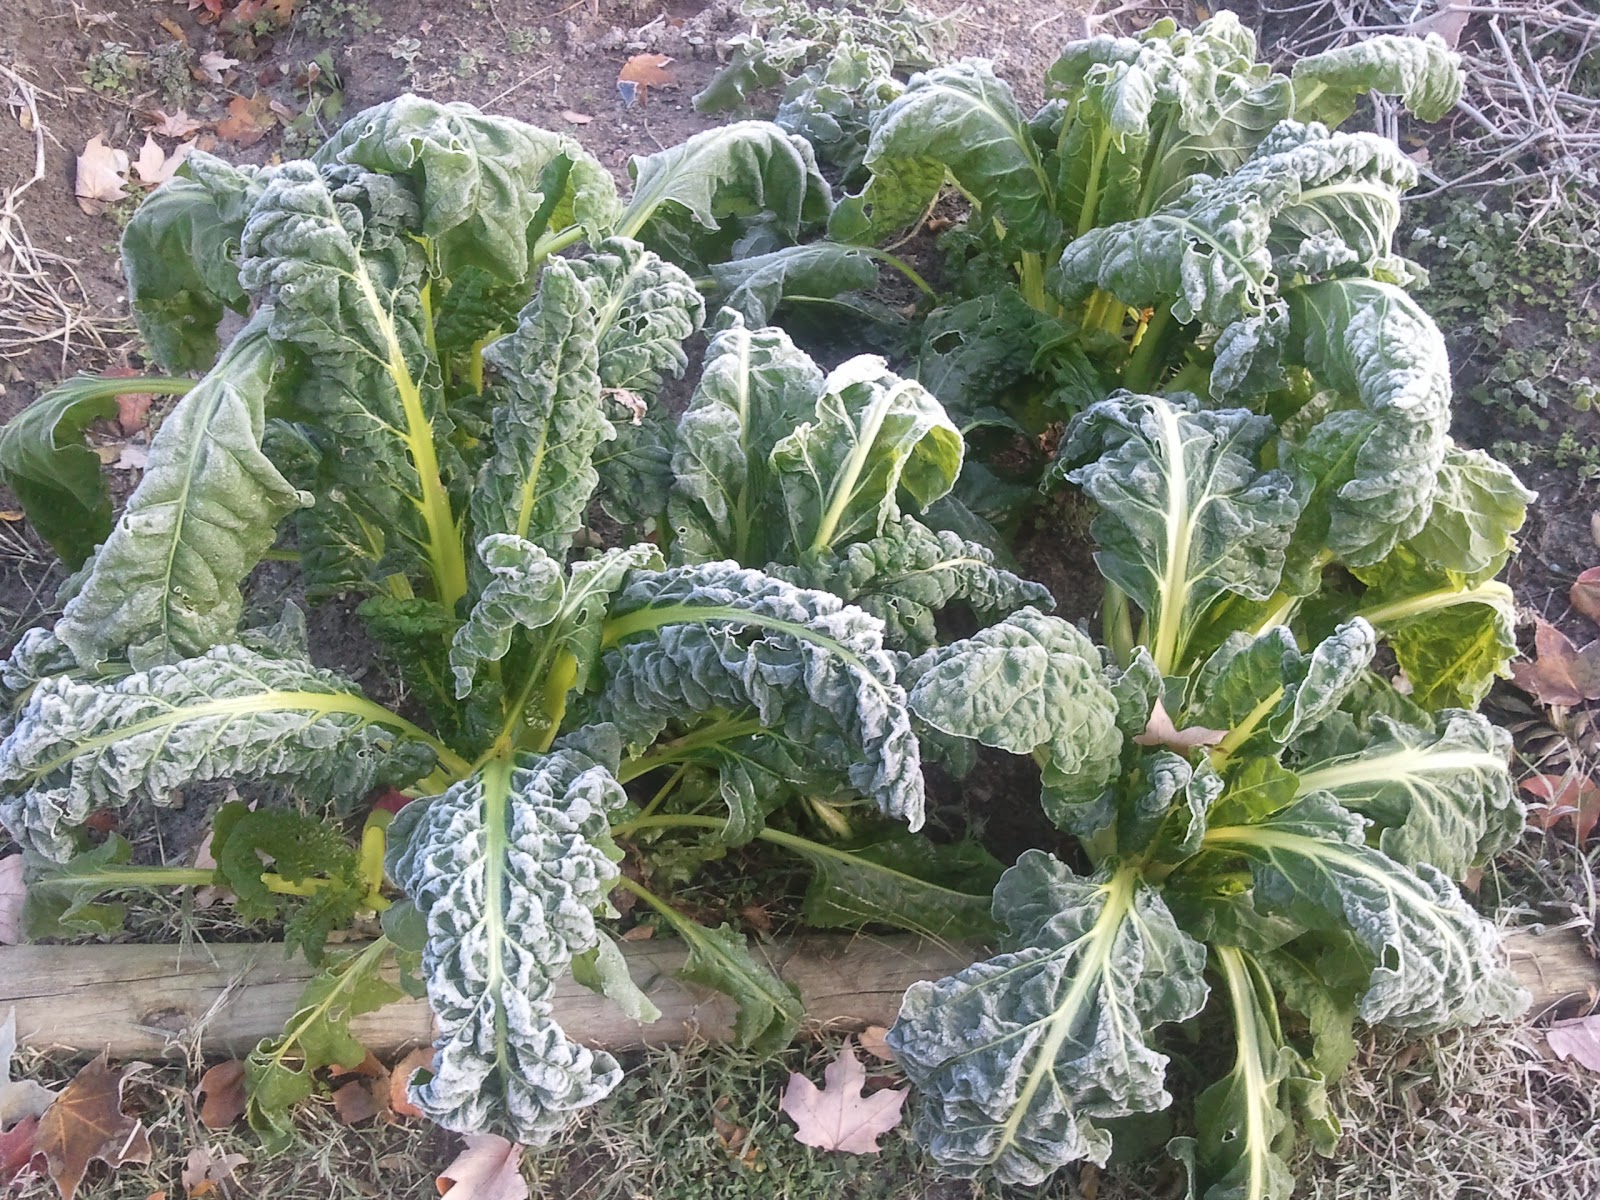
3.  Know how much time you have.  If your expected first frost is October 31, and it's August 31, then whatever you plant needs to mature within 60 days, or you need to be able to eat it young and immature.  It's also a good idea to plant cold-hardy vegetables.  I've had success with kohl rabi, collards, arugula, mustard greens, radishes, swiss chard, carrots, lettuce, and celeriac.
4.  Fool the frost.  We've been very lucky here in Central Virginia this year with a mild winter.  The first frost arrived on-time, but we've only had a couple heavy frosts.  I think the coldest overnight low so far has been 26 degrees.  If your forecast calls for a serious overnight cold spell, don't fret...just cover those plants.  A clear plastic sheet, secured on either side of the row, does the trick for me.

Leaves piled over the live plants works too.  Using both of those methods, you'll need to go uncover them the next morning.  Other, more permanent ways to extend the season include hoop houses and cold frames.  I haven't tried those, since the greenhouse meets most of my winter gardening needs.  However, a great book about extending the harvest using those and other methods is The Year Round Vegetable Gardener by Niki Jabbour.  I found it at my local library, and it's full of good tips and ideas.  Niki's blog about gardening in Nova Scotia is a good read as well.  Clearly, if she can have fresh salads during the snowy Canadian winter, mere mortals like me can pull it off in balmy Virginia.

Advice needed...I have a ton of is collard greens, and I need a new recipe.  We've got the deep-south, cooked with smoky pig parts and vinegar style collard greens down pat.  Anyone have another tasty way to cook collards?

Tuesday, November 20, 2012

Leaves and Leftovers

This weekend was clean-up day for the garden.  Plants killed by frost were ripped out and added to the compost.  Tomato stakes were pulled and put away for the winter.
After all the removal, we still have a lot of edibles available.  The list includes green onions, beets, red leaf lettuce, swiss chard, celeriac, arugula, collards, New Zealand spinach, kohl rabi, mustard greens, and radishes.  These garden leftovers should make some tasty stir-fry and salads over the next few weeks.
Everything left has survived a couple hard frosts.  These guys are tough and hardy.  Once the garden inventory was complete, it was time to tackle leaves.  Everyone helped, and placed the leaf harvest in the garden.
I spread the leaves in the troughs between the seedbeds, and stepped on them to compact them in and keep them from blowing around too much.  My hope is that they will decompose some over the winter, turning into leaf mold that I can till into the soil.  This was the first raking.  There will be more leaves.

Thursday, November 8, 2012

Frost

Planting in late summer for an autumn harvest is a great way to extend the gardening season and keep putting tasty stuff on the supper table.  Here in Central Virginia, first frost generally hits at the end of October, so as long as you can count backwards from that average frost date, and only put in things that can mature in time, you can squeeze in a second growing season.
In this recent harvest, the green beans and the sugar snap peas are from plants grown from seed that went in the ground in late August.  I planted about a fourth of the garden with relay crops then, and put down clover as a cover crop a little later.
Clover is in the foreground.  Starting on the right and working to the left, you can see New Zealand spinach, collard greens, arugula, snap peas, and my Kentucky Wonder bean tepee, which produced all summer and fall.  Green beans are killed by frost.  Peas are hardier, as are the cabbage family greens like collards and mustard greens.  Earlier this week, a hard frost hit.
This was the first frost we'd had.  It was 29 degrees Fahrenheit that morning.
It was cold enough for ice to form in the top of these buckets of water.
These collards look frozen, but they defrosted and perked right back up.  The most important thing is to not pick anything while it is frosty, or you'll wind up with a pile of goo in your basket.  Let them unthaw, and then pick.  Interestingly, frost exposure generally alters the flavor of most vegetables for the good.  Root crops get sweeter, and leafy greens get tastier.
Our Swiss Chard, another August planting, appears totally defeated by the frost.  However, just like the collards, they warmed up and are doing just fine.  Chard is extremely cold hardy.  I've read that it can survive in snow.  Perhaps we'll find out first-hand.


Friday, October 26, 2012

What's in your wok?

Here were the ingredients in our most recent stir-fry, all from the garden...swiss chard, green onions, carrots, kohl rabi, and sugar snap peas.  I recently bought fresh ginger from a nearby farmer's market, and I'm ready to wok it up again soon.  There are still tasty things in the garden that need to be pulled and eaten.

The area is abuzz with talk of the impending landfall of Hurricane Sandy, a.k.a. The Frankenstorm.  We actually could really use some rain, just not the deluge that a tropical storm will bring.  I'm also not looking forward to high winds.

Oh well.  Wok on!

Tuesday, October 9, 2012

Surprises and Disappointments

For me, one of the coolest things about the third year of gardening the same ground and using compost I make myself is the growth of volunteer plants.  Vegetables that I did not plant appear like magic in the garden.  No, I don't think the gnomes are doing it.  Here's what happens... tomatoes, cucumbers, etc that rot on the vine get tossed in the compost or fall to the ground and get mixed into the soil.  In the spring, after the compost has been spread and the garden tilled, seeds from those rotten veggies that did not decompose sometimes germinate.  This year 4 or 5 red cherry tomato plants grew as volunteers, and this fall they have been producing fruit heavily.
Now, volunteer plants popping up are normal in a garden.  For me, they are a pleasant surprise.  An even bigger surprise is when a volunteer vegetable plant pops up and it's something that you have NEVER grown. This happened to me this year, and I discovered it recently while cleaning out a seedbed where I'd grown cucumbers.  Nestled in there was a vine with these odd bluish-green pods on it.  Inside each pod was what looked like a green cherry tomato.  Here's a picture...
The mystery fruit is on the right.  The pods are paper-thin, and on the far bottom right you can see what the inside fruit looks like.  Have you guessed what this is yet?  These are tomatillos, also known as ground cherries.  They taste similar to a tomato...a different flavor, a little less sweet, but in the same ballpark.

The conundrum is this - How did tomatillo seed get into my garden?  The easiest answer is via bird poop, but I'll never know for sure.  Maybe it was the gnomes.

So, in early summer I planted Connecticut Field Pumpkins as a relay crop after something else got harvested.  They took off, sending vines all over the garden.  A grand total of two pumpkins formed.  The first one was harvested but some sort of bug was already in it and it rotted on our counter top.  We had high hopes for the second pumpkin, but those hopes have been dashed...
This appears to be the work of a rabbit.  Cute little bastards.  I shake my fist at them, and think mean thoughts.  I don't think I'll be planting pumpkins again.  I'll probably go with butternut and acorn squash next year instead.  I did not plant butternuts this year, and Angelia misses them.

What's your favorite winter squash?


Thursday, September 20, 2012

The Fall Garden

It's mid-September, and the garden is steadily pushing out produce.  Beans are still coming in strong, but there's more.  Plenty more...
Carrots and beets are ready to be pulled whenever we want them.  Volunteer cherry tomatoes are producing, and in serious quantity.
A few larger tomatoes are ripening, every couple days.   We also have lots of hot peppers.  Above are Scotch Bonnets.  They have this gorgeous deep red/pink color.

This weekend, I need to get more beds cleaned out, plant some cover crop, and do a little food preservation.  Time to dehydrate.

Tuesday, September 11, 2012

How to grow your own Impatiens from seed for free

If you're unhappy plunking down good money to buy annuals at your local garden center, there is another way.  Scary as it sounds, you can grow your own.  I know, I know...this is crazy talk - anti-capitalist blasphemy...but hear me out.
If you have impatiens that you have kept alive all summer, go take a look at them.  There's a good chance that if it's early autumn, they have a new structure dangling somewhere near a blossom.  It's a seed pod, and they are the source of the plant's name.  Impatiens is Latin for "impatient," and these seed pods are very hasty fellows.  Don't touch the seed pod, but pick it by the stem.
These puppies are translucent, and you can see a dark center.  Those are the seeds.  If you're gentle as you pick them, you can carefully hold a bunch of them in your hand.
I take them in the house and set them on a piece of white paper.  Now the fun begins, unless you've already discovered their special surprise.  If you gently squeeze a seed pod, it will curl up with a snap and launch seeds into the air.  My sons, jaded and crass as they are, were even impressed by how cool it is to pop these seed pods.  They are capable of launching seeds a yard or more away.  However, if you pop them in a closed fist, or smash them flat with your hand, they won't be able to send seeds flying, and you'll find little brown seeds mixed in with the fleshy green pod parts.
Separate the seeds from the "popped" pods.  They ball up into little fists, and squeeze seeds out of the ends. At this point the white paper is just to help you see the seeds.
But once you've separated the seed, the paper is great for funneling the seed into an envelope for storage.  In the late winter or early spring, tear open the envelope and sprinkle them into damp seed starting mix.  Cover with plastic, and put the pot in a sunny place, and they will sprout.  Once the weather has warmed some, and the impatiens are large enough to survive the stress of it all, you can transplant them into shady or semi-shady parts of your yard.  They also do well in pots, and as long as you keep them watered, they will last until it gets cold.  Almost all of our impatiens this year were grown from seed.  It's easy, and you can do it too.
So, go see if your impatiens have seed pods, and get popping.

Monday, September 3, 2012

Weeds

I spent about 6 hours today in the garden.  It drizzled on and off this morning, but the ground was moist and perfect for weeding.  Not my favorite garden chore...I usually do a variety of things to avoid weeding, including laying down mulch, covering the tomato beds with black fabric, and planting crops so densely that the weeds don't see daylight.  Despite all that, wild flora will not be denied.  It grows, no matter what I do.  So I must rip them out.  Yes, rip them out.  Now that I use the seedbed method, the soil is not compacted, so for me, the most time-effective and satisfying weeding method is to rip them out with my bare hands.

I weeded 2 seedbeds, which amounts to 1/6 of the garden.  Here's the harvest:
After weeding, I planted a couple kinds of lettuce, radish, spinach, arugula, and Chinese cabbage.  We should have two months left before the first frost, so all those things will be harvest-able before then.  Assuming the frost is reading the same almanac that I am.

Sunday, August 26, 2012

Yard-long Beans

Today I harvested 4 different kinds of beans in the garden.  Clockwise from the bottom of the basket in the  picture are Kentucky Wonder pole beans, wax bush beans, Romano pole beans, and yard-long beans.  Also called asparagus beans, these asian beans vine like pole beans and produce long, thin, flexible pods that can grow up to 3 feet in length, but are tastiest when picket between 12 and 24 inches long.
The leaves grow in three's, just like normal beans, but they are narrower and a very dark green.  The pods form in pairs from a pale flower that forms on the end of a stem.  The plant is a prolific producer.  I found the seed at the Richmond Southern States on West Broad, and planted them in the same spot where I'd grown all those peas earlier in the season.
The long beans are chewier than regular green beans, and they are fantastic in a stir fry with other veggies.  Since we have a bunch of these in the fridge already, I decided to cook some yard-longs up for lunch today.
I chopped the beans into small pieces, less than an inch long, and boiled them in chicken broth for 5 minutes. In hindsight, this was an unnecessary step that I'll leave out next time.
I peeled and chopped 4 cloves of garlic.
Got oil hot in my wok.  I love my wok...it's seriously old-school, carbon steel.  You've got to season it just like a dutch oven.
I pulled a large green onion from the garden, and chopped it up while the oil heated.
Toss in the garlic.  Stir it a little, but on high heat it starts to brown right away.  Give it 45 seconds, and then toss in the onions to soak up the heat and keep the garlic from burning.
Stir the garlic and onions for a few minutes, and then add the beans.
Stir a few more minutes, then season with salt and pepper and plate it up.
Here's the finished product, with chopped peanuts on top.  It had good flavor, but I'd over-cooked the beans.  I wanted them a little firmer.  Still a tasty lunch, and I dish I will make again.

Ever had yard-long beans before?

Tuesday, August 7, 2012

Melons and the Summer Doldrums

Well, I'm back at home full-time, and back in the garden.  This was a harvest from over a week ago, probably the last really big harvest of the summer.  The peak of the tomato season is over.  Still plenty of fruit on the vines, but nothing like what it was 3 weeks ago.
The cabbages came in, and the banana melons are ripening one by one.
Some of them are really ugly on the outside, kinda twisted and gnarled-looking.
However, the insides are gorgeous, soft, and sweet.  They taste just like regular cantaloupe.
Last week I picked this monster banana melon.  My mother took a picture of me holding my baby.  Can you see the resemblance?
I sliced big boy open and attacked him with an ice cream scoop.  He produced about 2/3 gallon of ripe fleshy melon balls.  I was so proud.

Saturday, July 14, 2012

The Spice of Life

We are growing something like ten different kinds of tomatoes.  These normal red round guys above are Park Early Hybrids and Rutgers.  I actually can't tell them apart.
Here's our really yummy yellow tomatoes.  Good slicers.
These are the Mortgage Lifters, an heirloom pink beefsteak tomato.  Apparently they are called that because the guy who developed the seed paid off his house by selling them.
Cherokee Purples, a classic.
This is a yellow/orange beef tomato.  I bought one of these tomatoes from a Farmer's Market last year mainly to get the seeds.  This is the largest tomato my garden has ever produced.  I have the LEGO dude and sunglasses just to show the scale of this monster.
These are Paul Robeson Hybrid tomatoes.  They are very dark, black-type fruit from Siberia.
These are Tomande tomatoes.  Don't know much about them, other than they were on sale.  They're kinda orange.
Cherry tomatoes here.   Left to right, these are Chocolate Cherries, Ildis, and Supersweets.  The Supersweets are from volunteer plants.  There's like 4 of them in different parts of the garden.

So those are the types of tomatoes in the Givler Garden.

Tuesday, July 10, 2012

Pumping Out Tomatoes

With work taking up a huge amount of time right now, I am having to be very strategic about how I spend my free time.  I enjoy the blogging, but it's not a pressing concern, while spending time with the family is at the top of the list, and gardening is in the #2 slot.  The garden is needy, and it is pumping out tomatoes like crazy.  The picture above was from about 30 minutes of picking I did yesterday.
This was the Sunday tomato harvest.
This was the rest of the Sunday picking.  See the cabbage...Angelia fixed her delicious creamy cabbage yesterday and used it all up.
This was a harvest from last week.  Zucchini the size of baseball bats.  It's hard to catch them when they are younger and more delicious, although these guys will taste just fine sauteed with onions.  

I'll have another post soon about the different varieties of tomatoes that I'm harvesting.  What's your favorite kind of tomato?